Philips hd9015 – PHILIPS HD9015 — Отзывы
Отзывы о Хлебопечка Philips Daily collection HD9015/30
Самый полезный отзывМарат06.05.2018 Оценка: 4.7 Удобство использования Функциональность Качество приготовления МинусыОтзывПодарили эту хлебопечку мне на день рождения, и вместе с ней же электронные кухонные весы. Судя по отзывам, весы просто необходимы для точного дозирования ингредиентов. Первая же выпечка хлеба (с рекомендуемой инструкцией «средней» корочкой) привела в восторг. Во второй раз выбрал «румяную» корочку и чуть меньше добавил растительного масла — получилось еще лучше. Так как в прилагаемой книжке нет рецепта кекса, то нашел его в интернете и приготовил в режиме «кулич». В первый раз использования хлебопечки, в одном углу ведерка осталось немножко не перемешанной муки, которая потом запеклась в хлебе. Во второй раз, во время перемешивания теста, я просто «помог» лопаточкой. Еще пару раз готовил без присмотра, тесто перемешалось хорошо. Выбираю режим 750 гр, 1000 гр не пробовал, так как тесто после поднятия полностью заполняет ведерко. Хлеб получается однородный и очень вкусный. Прежде ездил за вкусным хлебом в пекарню за два квартала или в киоск «лепешки из тандыра», теперь же свежий и ароматный хлеб готовится у меня дома. Показать по оценкам:Всего 23 отзывовпо дате по дате по полезности по полезности по рейтингу по рейтингу Анастасия06.10.2017 Оценка: 5 Функциональность Качество приготовления ПлюсыОтверстие на крышке, что не дает эффект запотевания и можно ставить выпечку на ночь МинусыПока не обнаружила ОтзывХлебопечь мне понравилась, долго ждала скидок и дождалась. Была проблема с недокомплектом, не было в ней никаких бумажек. Но с этим магазин быстро справился. Пока готовила на нескольких программах, все хорошо замешивается и пропекается, бывает из-за дрожжей тесто опадает, но менее вкусным хлеб не становится. Я довольно, теперь хлеб не покупаем вообще. Буду экспериментировать дальше со сдобной выпечкой. Елена10.03.2018 Оценка: 4 Удобство использования Функциональность Плюсыметаллические движущиеся соединения Минусымерная ложка не соответствует количеству продуктов по весу ОтзывПрежде, чем купить, прочитала отзывы всех хлебопечек, выбрала значительно дороже этой, но в магазине оказалось у той пластмассовые движущиеся соединения. У этой металлические. Выбрала эту, и отзывы у неё неплохие. Но… когда начала дома пользоваться, просто расстроилась — у меня ничего не получалось. По совету бывалых, я начала сама экспериментировать с рецептами по вложенной книге и поняла, что пресловутая мерная ложка не соответствует заявленному весу. Тогда продукты начала замерять на кухонных электронных весах. Вроде как получилось. По поводу, рекомендовала ли я — думайте сами: цена, сравнительно, небольшая, металлические соединения (нагрузка действительно большая), но качество среднее, надо приноровиться… игнатьева02.10.2015 ооооочень тихая, до нее какая то была у нас ну невозможно скребла своим тестомесом ужасно, важно что есть программа бородинский хлеб, в этом ценнике мы не нашли у других моделей этой программы, варенье даже можно делать, рецепты классные хлеб получается пышный, почти все программы пробовали кроме теста, советую лариса31.08.2016 Хлеб пропекается отлично с хрустящей корочкой,но ведерко снизу протекает,пока пользуемся — очень обидно. Если бы не этот заводской дефект отличная хлебопечь. Николай16.10.2017 Оценка: 4.7 Удобство использованияФункциональность Качество приготовления ПлюсыСоотношение цена/качество. МинусыКнопка «Старт/Стоп/Пауза» работает только на Старт. ОтзывМарина: Первый хлеб получился с проваленной коркой, потому что поднялся до окошка, коснувшись его — сдулся. На воде получается жидкий хлеб (но это не из-за хлебопечки). Я пеку белый на молоке или с добавление яиц, или сочетание из яиц, молока и воды. Плохо, что кнопкой Старт нельзя остановить процесс, я один раз вместо выбора программы нажала на Старт и уже ничего нельзя изменить, даже отключением от питания. И у меня бородинский пекся на режиме»белый хлеб», но ничего, тоже нормально получилось анна липинская21.07.2015 купила недавно отлично пропекает равномерно, много рецептов, чаша плотная ничего не подгорает. Советую и Вам! Елена20.07.2015Люблю технику филипс. С печкой тоже не прогадала. Пеку в основном белый хлеб и кексы. До этого была панасоник 254, в ней не было окошка, а в филипсе есть. Это очень помогает для наблюдения за работой дрожжей. Программ больше чем в панасонике, качество чаши мне тоже больше нравится. анна липинская21.07.2015 Хорошая порадовала, отлично пропекает, хлеб получается вкусный, тесто приподнимается очень хорошо. Рецепты интересные и доступные. Осталась довольна! Люся15.01.2014 На днях купили, пробовали пока 2 раза, очень довольны! Анна Липинская21.07.2015 Купили на днях, уже большинство рецептов попробовала, равномерно пропекает, ничего не подгорает, рецепты очень доступные по ингредиентам. Всем советую!!!! Татьяна11.03.2018 Оценка: 3.7 Удобство использования Функциональность Качество приготовления ПлюсыПриемлимая цена, гарантия два года МинусыШум при замесе и очень громкий сигнал ОтзывКупила эту хлебопечь несколько дней назад, три раза испекла хлеб. Никаких проблем с выпечкой. Никакого запаха пластика. Приобрела новую хлебопечку, так как привыкли к своему хлебу, а старая отказала после 1,4 года работы, просто перестала печь, после пяти часов работы подсушенное не поднявшееся тесто, а гарантия была один год. На эту модель производитель дает два года гарантии, надеюсь, что Philips окажется качественнее. Единственное, что напрягает, это шум при замесе и очень громкий сигнал для добавления ингредиентов, на ночь не поставишь. Прошлая хлебопечка в этом плане выигрывает, замес слышно только, если рядом находишься, даже сигнал и то тихий. Лариса07.04.2018 Оценка: 4.3 Удобство использования Функциональность Качество приготовления ПлюсыЛегкость управления. Простая книга рецептов. Устойчиво стоит на прорезиненых ножках. МинусыПлохо промешивает тесто справа, остается мука. ОтзывЗа 3 дня пекла уже 4 раза. Испробовала 1 самый простой рецепт белого, кулич и экспресс выпечка. Пока хорошее впечатление только от первого рецепта. За 4 часа получился отличный хлеб, очень вкусный, но справа в обоих случаях оставалась мука и недомешанное тесто 🙁 Кулич очень красиво поднимался (наблюдала в окошко) НО! Я не поняла как он резко сдулся и впал в центр 🙁 прямо дырка получилась…по краям вытек .. подозреваю огрехи в рецепте, в следующий раз буду перевешивать на весах… А при ускоренной выпечки….совсем не поднялся и корочка не запекать и сырой мякиш внутри :((((( Пока разочарована, но буду пробывать менять рецепты и перевешивать ингредиенты на весах. Екатерина08.10.2015 Вот вроде простая хлебопечка, но хлеб в ней получается божественный. Нашла рецепт на майл ру «Хлеб с сыром» получилось очень вкусно. Удобно что она подаёт сигнал когда можно открыть крышку и засыпать начинку, будь то изюм, орехи или в моём случае сыр. Очень довольна покупкой Игорь14.02.2016 Хлебопечка Philips HD9015/30 не оправдала ожиданий. Тесто не подходит, т.к. не выдерживается температура, плохо промешивается — мука остается по углам и краям, хлеб не поднялся, а внутри оказался вообще сырой мякиш. Возможно заводской брак.Пришлось вернуть. Разочаровывает Philips последнее время. Евгения16.04.2018 Оценка: 5 Удобство использования Функциональность Качество приготовления ПлюсыС первого раза получился отличный хлеб, не шумная, не пахнет пластиком. МинусыДовольно противненько (хоть и не громко) пикает по окончании. ОтзывМы довольны, промешивает отлично, печет тоже. Никита23.08.2018 Оценка: 5 Удобство использования Функциональность Качество приготовления ПлюсыОтличный внешний вид; Множество программ + что очень удивило, есть режим приготовления йогурта и варенья; Звук громкий, не пропустишь момент когда нужно что-то добавить (ну изум, например, зерна и прочее) МинусыГоворят, что тонкий антипригарный слой у чаши… посмотрим; Шнур коротковат, но не критично. ОтзывПробовали многие рецепты, именно как написано в книжке. Сдоба шикарная, зерновой также. А вот остальные нужно пробовать, бывает верх хлеба опадает. Если чуть изменить количество воды, то всё отлично. Короче пробовать можно многое, не держитесь вы за эту книгу рецептов. Юлия14.01.2019 Оценка: 5 Удобство использования Функциональность Качество приготовления ПлюсыУдобна в использовании, 12 программ позволяют печь хлеб на любой вкус, книга рецептов. МинусыНепромес теста по краям ведерка, но это легко решается с помощью силиконовой лопатки. ОтзывПриобрела данную хлебопечку неожиданно для себя — не хотелось терять 15%-ю скидку, о чем ни капельки не жалею. В нашем доме теперь регулярно пахнет свежим хлебом, а это непередаваемые ощущения. По сабжу: управление хлебопечкой удобно и понятно, есть возможность выбора цвета корочки, размера буханки, количество программ и рецептов в прилагаемой книге обеспечит вас разнообразным хлебом, есть программа замеса кислого теста, варки варенья. Для успеха важно соблюдать рекомендации производителя, использовать именно хлебопекарные дрожжи, а не моментальные. Еще нужно учитывать, что данная хлебопечка рассчитана на выпечку хлеба по классическим рецептам и делает три замеса теста, поэтому при применении рецептов для других х/п нужно брать меньшее количество дрожжей. При замесе теста по краям ведерка остается непромешанная мука, поэтому в процессе замеса нужно помогать силиконовой лопаткой, подмешивая муку из углов к основной массе теста. Алёна22.11.2017 Оценка: 5 Удобство использования Функциональность Качество приготовления Купили почти 2 года назад, по настоящее время не разочаровались. Очень удобная хлебопечка, хлеб хорошо пропекается, имеющееся количество опций достаточно для пользования в домашних условиях. Евгения09.08.2017 Оценка: 5 Удобство использования Функциональность Качество приготовления Отличная хлебопечка, не могу нарадоваться. Муж в восторге от домашнего хлеба. Не могу нарадоваться. Всем рекомендую. Результаты: 20 из 24 |
compandother.ru
Philips HD9015 цена, характеристики, отзывы
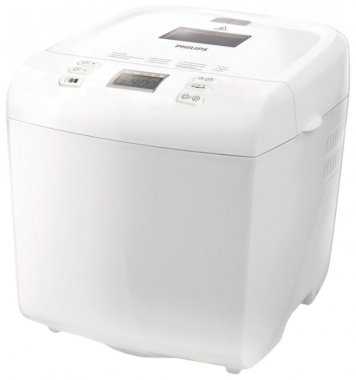
- -Форма выпечки: буханка
- -Выбор цвета корочки: есть
- -Мощность: 550 Вт
- -Регулировка веса выпечки: есть
- -Максимальный вес выпечки: 1000 г
- -Таймер: есть, до 13 ч
- -Поддержание температуры: есть, до 1 ч
- -Варенье: есть
- -Замес теста: есть
- -Бездрожжевая выпечка: есть
Здесь вы можете посмотреть видео обзор Philips HD9015. Узнать характеристики, прочитать отзывы о Philips HD9015.
Видео обзоры
При отсутствие точных совпадений для Вас доступны видео похожих моделей, они отмечены серым цветом.
Магазины, в которых можно купить этот товар и его аналоги
Характеристики
* Точные характеристики уточняйте у продавца.
Основные характеристики| Форма выпечки | буханка |
| Выбор цвета корочки | есть |
| Мощность | 550 Вт |
| Регулировка веса выпечки | есть |
| Максимальный вес выпечки | 1000 г |
| Таймер | есть, до 13 ч |
| Поддержание температуры | есть, до 1 ч |
| Варенье | есть |
| Замес теста | есть |
| Бездрожжевая выпечка | есть |
| Количество программ выпечки | 12 |
| Особенности | программирование |
| Число тестомешателей | 1 |
| Диспенсер | нет |
| Материал корпуса | пластик |
* Точные характеристики уточняйте у продавца.
Форум Philips HD9015
Задать вопросnaobzorah.ru
Хлебопечки Philips HD9015 — Отзывы покупателей
Deril26.05.2017
Оценка: 3
Взял на замену HD 9020, у которой ведро за 4,5 года развалилось. Новое за 2000 брать не стал, решил поменять всю печь (надеялся так же на года 4 работы). В итоге нашел себе занятие на 2 месяца. Попалась бракованная, не до конца вымешивала всю муку, из-за чего с хлеба приходилось соскребать изрядное ее колличество. Магазин в отказку пошел, благо служба поддержки Филипс все вопросы решила, в СЦ направили и акт для магазина все таки дали, признав брак (за это им большой респект). Но больше я из печку не возьму. Качество пластика, ведра, и в целом сборка не лучше какой нибудь Скарлет. Раньше было намного качественней.
За: Хорошо пропекает хлеб, количество програм
Против: качество изготовления сильно упало, по сравнению с печками 4хлетней давности
Denizzz Che18.12.2016
Оценка: 5
Отлично работает
За: Отличная помощью на кухне
Против:
cesar21.07.2016
Оценка: 5
Наверно самая полезная покупка кухонной техники за последние несколько лет! Ставим таймер на утро и когда будит запах свежего хлеба распространяющийся по всей квартире, то это непередаваемые ощущения! Все программы работаю отлично, кроме экспресс-выпечки, которая пытается испечь хлеб менее чем за 1 час. Внутри не пропекся, поэтому этот режим больше не используем. Бородинский хлеб получился отменный. Тесто месит здорово, если хотите бездрожжевое, то выбирайте режим тесто и через 17-20 минут выключайте хлебопечь и получится бездрожжевое тесто! Довольна вся семья, уплетаем булку за день, а то и за пол))
За: Наивкуснейший хлеб. Корочка хрустящая.
Против: Шумновата, днем нормально, а когда ночью по таймеру работает, то слышно как мешает.
abc26.04.2016
Оценка: 1
Странная хлебопечка, хлеб вообще не получается, пробовали из разных дрожжей с разной мукой, разные рецепты, НО итог один, хлеб просто никакой. За время выпечки поднимается несколько раз тесто, а когда начинает печь то хлеб потом опускается и получается кирпич несъедобный. Не советую ее покупать. Деньги на ветер.
За: к сожалению их нет
Против: шумная, плохо печет хлеб.
Arvale11.11.2015
Оценка: 5
Устраивает в печечке практически все. Обожаю её лаконичный дизайн, ничего лишнего, белая красотка, очень удобная в управлении. Тихая, в обычной квартире за закрытой кухонной дверью, среди ночи начинает работать (чтобы хлеб утром был горячим) никого не будит, совершенно её не слышно. Печем каждый день, прощай, магазинный хлеб )
За: Печёт красивенный хлеб с хрустящей корочкой!
Против: Кажется неточные объемы продуктов указаны в рецептах, как-то сыроват. Хотя не всегда )
Cushla04.09.2015
Оценка: 5
Хлебопечка ,,огонь,,!!! Готовит все правильно по рецепту, ничего лишнего ни в дизайне, ни в управлении, в общем работяга! Жена довольна, доволен и я!)
За: Компактная, простая в управлении
Против:
Arshinov22.07.2015
Оценка: 5
Отличная хлебопечка выпекал в ней кулич, бородинский хлеб. Очень вкусно выпекает, ровный цвет корочки.
За: Все самое не обходимое, лишнего нечего нет.
Против: их нет.
Deril28.04.2015
Оценка: 5
Впечатлений море. Все положительные. Очень удобный дизайн, размеры именно те, что нужны. Смотрела другие модели и бренды-ни в какое сравнение, инопланетные корабли) Никакого запаха, приятные комплектующие. Вообще,люблю этот бренд за простоту и качество. Ничего лишнего.Проста, умна, красива, со своими обязанностями справляется на 100%. Единственное, о чем жалею-покупать нужно было гораздо раньше… И как я жила без неё?????))))
За: Дизайн, комплектация,качество
Против: Нет
Chio09.04.2015
Оценка: 5
Хлебопечь купила впервые. Цвет корочки теперь выбираю сама да и вес выпечки можно регулировать. Хлеб получается вкусный, по-домашнему. Никак не нарадуюсь!!! Оказалось, в ней ещё можно и варенье варить! Летом попробую.
За: Компактная, недорогая, проста в применении.
Против: Нет.
alvor_plus11.06.2014
Оценка: 5
это уже третья печка за 15 лет до этого была LG и Делонги. Эта не хуже, всё делаю по рецепту от этой печки.
За: печёт вкусный хлеб
Против: пока нет
Bad_snake15.05.2014
Оценка: 5
За: Простая,удобная,хорошая форма самой ХП,качественное ведерко. Доверяю фирме.
Против: Немного невнимательно прочитала инструкцию,она для всех ХП Филипс, выяснилось,что нет программы замеса пресного теста. Но впечатления от выпечки хлеба и простоты процесса подготовки к ней,улетучили моё небольшое разочарование. Да,и как уже писали,марки на стаканчике не очень хорошо видны. Это ерунда.
Ani07.04.2014
Оценка: 5
Сегодня первый день использования. Первый запуск первого хлеба вызвал только положительные эмоции. Запаха пластика до выпечки, во время выпечки и после нее — не появлялся. Звук замеса перестала слышать как только занялась прочими делами так что, считаю не шумной. Качеством довольна, только не понятно, почему крышка не имеет защелки. Добавляю: Книга рецептов предназначена для другой печки. Внимательно сверяйте программу книжки с режимами на крышке печки, они практически не совпадают! В рецепте французского хлеба не хватает сахара, без него хлеб не поднимается — добавляю 1 ст.ложку. Сама печка продолжает радовать.
За: проста, лаконична, удобна. Первый хлеб (делала строго по рецепту) получился на ура! Фиксация формы поворотом (в старой хлебопечке 20-ти летней давности такого не было). Цвет корочки ровный. Мякиш равномерный. Далее начну эксперементировать и по мере пользования комментарии продолжу.
Против: мерный стаканчик имеет плохо видимую шкалу, что в прочем не мешает пользоваться другими мерными емкостями имеющимся в наличии.
protovar.ga
PHILIPS HD9015 USER MANUAL Pdf Download.
Register your product and get support at
www.philips.com/welcome
HD9015
HD9016
EN User manual
UK Посібник користувача
RU Руководство пользователя
Specifications are subject to change without notice
© 2012 Koninklijke Philips Electronics N.V.
All rights reserved.
HD9015/HD9016_UM_V1.0
3140 035 31731
English
1 Important
Read this user manual carefully before you use the appliance, and save the user manual for
future reference.
Danger
•
Never immerse the body of the breadmaker in water or any other liquid, nor rinse it
under the tap.
•
Do not cover the steam and air vents while the breadmaker is operating.
Warning
• This appliance can be used by children aged from 8
years and above and persons with reduced physical,
sensory or metal capabilities or lack of experience
and knowledge if they have been given supervision
or instruction concerning use of the appliance in a
safe way and understand the hazards involved.
• Children shall not play with the appliance. Cleaning
and user maintenance shall not be made by children
unless they are older than 8 and supervised.
• Keep the appliance and its cord out of reach of
children less than 8 years. Do not let the mains cord
hang over the edge of the table or worktop on
which the appliance stands.
• If the mains cord is damaged, you must have it
replaced by Philips, a service centre authorised by
Philips or similarly qualified persons in order to
avoid a hazard.
• The appliance is not intended to be operated by
means of an external timer or a separate remote
control system.
• The accessible surfaces may become hot during use.
• Do not put over 560 g flour, and 9 g, 12 g, 14 g
yeast for general bread, super rapid bread, and
easter cake programs respectively.
•
Check if the voltage indicated on the appliance corresponds to the local mains voltage
before you connect the appliance.
•
Only connect the appliance to an earthed wall socket. Always make sure that the plug
is inserted firmly into the wall socket.
•
Do not use the appliance if the plug, the mains cord, the body of the appliance or the
bread pan is damaged.
•
Make sure that the heating element, the rotating shaft of the bread pan and the outside
of the bread pan are clean and dry before you put the plug in the wall socket.
•
Do not use the appliance for any other purpose than described in this manual.
•
Do not plug in the appliance or operate the control panel with wet hands.
•
Do not come near the steam and air vents with your face or hands when the appliance
is operating.
•
Do not open the lid during the baking process, as this may cause the dough or bread
to collapse.
•
During the baking process, the appliance itself and the lid become extremely hot. Be
careful not to burn yourself.
•
Do not remove the bread pan from the appliance during use.
•
Never use any utensils to mix the ingredients in the bread pan during a baking program.
•
Only put ingredients in the bread pan. Do not put or spill any ingredients and/or
additives in the inside of the appliance to avoid damage to the heating element.
•
When you remove jam from the bread pan, lift the bread pan with both hands in oven
mitts to pour out the hot jam.
Caution
• This appliance is intended for household use only. If
the appliance is used improperly or for professional
or semi-professional purposes or if it is not used
according to the instructions in the user manual, the
guarantee becomes invalid and Philips refuses any
liability for damage caused.
•
Never use any accessories or parts from other manufacturers or that Philips does not
specifically recommend. If you use such accessories or parts, your guarantee becomes
invalid.
•
Do not touch the bread pan with sharp utensils to avoid damage.
a
b
c
d
•
Do not expose the appliance to high temperatures, nor place it on a working or still
hot stove or cooker.
•
Always place the appliance on a stable, level and horizontal surface.
•
Always put the bread pan in the appliance before you put the plug in the wall socket
and switch on the appliance.
•
Always unplug the appliance after use.
•
Always let the appliance cool down before you clean or move it.
•
Do not place the bread pan in a conventional oven to bake bread.
•
The accessible surfaces may become hot when the appliance is operating. Always use
oven mitts when you lift the bread pan by its handle or when you handle the hot bread
pan, the kneading blade or the hot bread.
•
Beware of the hot steam that comes out of the steam vents during baking or out of
the breadmaker when you open the lid during or after the baking process.
•
Do not lift and move the appliance while it is operating.
•
Do not touch moving parts.
•
Do not expose the appliance to direct sunlight.
•
Do not insert metallic objects or alien substances into the steam vents.
•
Do not use the bread pan if it is damaged.
•
Always clean the appliance after use.
•
Do not clean the appliance in the dishwasher.
•
Do not use the appliance outdoors.
•
Leave a free space of at least 10cm above, behind and on both sides of the appliance
to prevent damage due to radiated heat.
•
To avoid damage to the appliance, do not place the bread pan or any other object on
top of the appliance.
Recycling
Your product is designed and manufactured with high quality materials and components,
which can be recycled and reused.
When you see the crossed-out wheel bin symbol attached to a product, it means the
product is covered by the European Directive 2002/96/EC:
Never dispose of your product with other household waste. Please inform yourself
about the local rules on the separate collection of electrical and electronic products.
The correct disposal of your old product helps prevent potentially negative
consequences on the environment and human health.
Electromagnetic fields (EMF)
This Philips appliance complies with all standards regarding electromagnetic fields (EMF). If
handled properly and according to the instructions in this user manual, the appliance is safe
to use based on scientific evidence available today.
Power failure backup
This appliance has a backup function that remembers the status before a power failure,
provided the power supply resumes within 10 minutes. If the power failure occurs during
a cooking process, the countdown of the cooking time continues where it left off when
the power supply resumes. If the power failure lasts longer than 10 minutes and the failure
occurs during a cooking process, the breadmaker automatically resets to the preset setting
when the power supply resumes. Open the breadmaker, remove its contents and start all
over again. If you have set the timer and the preset cooking process has not yet started when
a power failure occurs, the breadmaker automatically resets to the preset setting when the
power supply resumes. Open the breadmaker, remove its contents and start all over again.
2 Introduction
Congratulations on your purchase and welcome to Philips! To fully benefit from the support
that Philips offers, register your product at www.philips.com/welcome.
3 Your breadmaker
Main unit
Viewing window
Control panel
Cover lid
Mains plug
Control panel
Timer increase
Loaf weight
Timer decrease
Program menu
Crust color
Start/stop/cancel button
LCD status display
Accessories
Kneading blade
Measuring spoon
Bread pan
Measuring cup
Hook
Yoghourt
HD9015/HD9016
e
f
g
X1
X4
X5
HD9045
HD9046
X8
X8
X11
HD9016 only
BEEP
(HD9016 only)
4 Use your breadmaker
Before the first use
1
Remove all packaging material from the appliance. Be careful not to throw away the
kneading blade.
2
Remove any labels from the body of the appliance.
3
To remove any dust that may have accumulated on the appliance, wipe the outside of
the appliance, the bread pan and the kneading blade with a damp cloth.
Note
• Never use scouring pads, abrasive cleaning agents or aggressive liquids such as petrol or
acetone to clean the appliance.
4
Dry all parts thoroughly before you start to use the appliance.
Prepare your breadmaker and ingredients
1
Put your breadmaker on a stable, horizontal and level surface.
2
Turn the bread pan anticlockwise and lift it out.
3
Push the kneading blade firmly onto the shaft.
4
Measure the ingredients for the recipe you want to prepare (see section ‘bread recipes’
below).
•
Always measure ingredients accurately.
•
All ingredients should be at room temperature unless recipe suggests otherwise.
5
Put ingredients in the bread pan in the order they are listed in the recipe.
Note
• Do not add more quantities than mentioned in the recipe as it may damage the breadmaker.
•
The yeast should be dry and separate from other ingredients when it is added to
the bread pan.
•
Butter and other fats should be cut into small pieces before putting in the bread
pan to aid the mixing.
•
If necessary, use a spatula to scrape down the sides of the bread pan to get the
mixture sticking to the wall back to the mix.
•
During the mixing stage, there will be beep sounds to alert you to add additional
ingredients such as nuts if you wish.
6
Put the bread pan in the appliance. Turn the bread pan clockwise until it locks into
position.
Note
• If the bread pan is not assembled properly, the kneading blade does not turn.
7
Put down the handle of the bread pan and close the lid of the appliance.
8
Put the mains plug in the wall socket.
» The appliance beeps and ‘1’ and ‘3:55’ appear on the display, which refers to the
‘White’ program.
Set your breadmaker
1
Press (menu button) repeatedly to select the program.
•
The select program number and processing time are displayed.
•
For detailed program description, see section ‘Bread recipe’ below.
2
Press (crust color button) repeatedly to select the crust color.
•
The selected crust color can be changed from light to dark.
3
Press (loaf weight button) repeatedly to select the loaf weight.
•
Make sure the selected weight is appropriate for the amount of ingredients of the
selected recipe. See section ‘Bread recipe’ below.
4
Press (Start/stop button) to start bread making process.
Caution
• During the baking process, the breadmaker itself and the lid become extremely hot. Be careful
not to burn yourself.
» The display counts down the processing time until the bread is ready.
» When the baking process is finished, the breadmaker beeps and goes to the keep-
warm mode (for 60 minutes).
Preset time for delayed baking
You can use the timer if you want the bread to be ready at a later time. The maximum delay
time that can be set is 13 hours.
Note
• Do not use the timer function with recipes that require fresh ingredients that may go bad, for
instance eggs, fresh milk, sour cream or cheese.
1
Put all ingredients in the bread pan.
2
Select the appropriate program, loaf size and crust color for your recipe.
» The total processing time is shown on the display.
3
Press
(timer increase and timer decrease) to choose the desired preset
time.
» The breadmaker enters preset mode.
X2
X3
X6
X7
X9
X10
•
For example, if the current time is 19:00 and you want your bread ready at 7:00
next morning (12 hours later), you can set the preset time to 12:00.
•
If you keep the button pressed, the time increases more quickly.
•
If the time on the display reaches 13 hours and you still keep the timer button
pressed, the display goes back to the baking time of the set program.
4
Press
(start/stop/cancel button).
» The timer counts down the set time in minutes.
» The bread is ready when the timer has counted down to 0:00 and the
breadmaker beeps.
Finish the baking process
Caution
• The inside of the breadmaker, the bread pan, the kneading blade and the bread are very hot.
• Always use oven mitts when you remove the bread pan at the end of the baking cycle or at
any time during the keep-warm mode.
1
To power off the breadmaker, remove the mains plug from the wall socket.
2
Using pot holders or oven mitts, open the lid and turn the bread pan anticlockwise.
3
Grab the bread pan by its handle and lift it out.
4
Turn the pan upside down, hold the handle and shake the bread out.
Note
• Do not use metal utensils to remove the bread, as these may damage the non-stick coating of
the bread pan.
• Be careful, the bread pan and the bread are hot.
5
Use the hook supplied to remove the kneading blade from the shaft/bread.
•
Always make sure that the kneading blade does not stay inside the bread,
otherwise you may damage the kneading blade when you slice the bread.
6
Let the breadmaker cool down before you clean it.
Making Yoghurt (HD9016 only)
Note
•
Ensure the yoghurt container is thoroughly washed with warm water and soap, and it is
dried before making yoghurt.
•
Full fat, skim, or 2% milk can be used
•
Make sure the yoghurt is fresh and thus the culture starter is active
1
The milk and yoghurt mixture proportion is 10:1 (For example: 400ml Milk with 40ml
yoghurt)
2
Pour milk into the yoghurt container
3
Add yoghurt into the yoghurt container, and mix well.
4
Close and tighten the lid
5
Start the yoghurt program, and yoghurt will be ready in 8 hours
5 Cleaning and Maintenance
Note
• Uplug the breadmaker before starting to clean it.
• Wait until the breadmaker has cooled down sufficiently before cleaning it.
• Never immerse the appliance in water or any other liquid, nor rinse it under the tap.
• Never use scouring pads, abrasive cleaning agents or aggressive liquids such as petrol or
acetone to clean the appliance.
• For maximum safety, keep the appliance clean and free of grease and food residues.
Interior
Inside of the cover and the main body:
•
Wipe with wrung out and damp cloth.
•
Make sure to remove all the food residues stuck to the breadmaker.
Heating element:
•
Wipe with wrung out and damp cloth.
•
Remove sfood residues with wrung out and damp cloth or toothpicks.
Exterior
Surface of the cover lid and outside of the main body:
•
Wipe with a cloth damped with soap water.
•
ONLY use soft and dry cloth to wipe the control panel.
•
Make sure to remove all the food residues around the control buttons.
Accessories
Bread pan:
•
Clean the bread pan with a soft cloth moistened with hot water or washing-up
liquid.
•
Do not immerse the bread pan in water and do not clean it in the dishwasher.
Kneading blade, measuring spoon and cup, and hook:
•
Soak in hot water and clean with sponge.
Tip
• After baking, immediately remove the kneading blade from the bread pan to prevent it from
getting stuck.
6 Storage
Store your breadmaker in a safe and dry place.
7 Bread ingredients
Bread flour
Bread flour has high content of high gluten (so it can be also called high-gluten flour which
contains high protein), it has good elastic and can keep the size of the bread from collapsing
after rise. As the gluten content is higher than the common flour, so it can be used for
making bread with large size and better inner fiber. Bread flour is the most important
ingredient of making bread.
Whole-wheat flour
Whole-wheat flour is ground from grain. It contains wheat skin and gluten. Whole-wheat
flour is heavier and more nutrient than common flour. The bread made by whole-wheat
flour is usually small in size. So many recipes usually combine the whole -wheat flour or
bread flour to achieve the best result.
Rye flour
Rye flour has high fiber level but it has lower gluten content than wheat flour. Rye bread
usually has darker color and stronger taste than white and wheat bread. It should be used
with bread flour in this breadmaker.
Corn flour and oatmeal flour
Corn flour and oatmeal flour are ground from corn and oatmeal separately. They are the
additive ingredients of making rough bread, which are used for enhancing the flavor and
texture.
Sugar
Sugar is very important ingredient to increase sweet taste and color of bread. And it is also
considered as nourishment in the yeast bread. White sugar is largely used. Brown sugar,
powder sugar or cotton sugar may be called by special requirement.
Yeast
After yeasting process, the yeast will produce carbon dioxide. The carbon dioxide will
expand bread and make the inner fiber soften. However, yeast fast breeding needs
carbohydrate in sugar and flour as nourishment.
1 tsp. active dry yeast =3/4 tsp. instant yeast
1.5 tsp. active dry yeast =1 tsp. instant yeast
2 tsp. active dry yeast =1.5 tsp. instant yeast
Yeast must be stored in the refrigerator, as the fungus in it will be killed at high temperature,
before using, check the production date and storage life of your yeast. Store it back to the
refrigerator as soon as possible after each use. Usually the failure of bread rising is caused by
the bad yeast.
The ways described below will check whether your yeast is fresh and active.
(1) Pour 1/2 cup warm water (45-50°C) into a measuring cup.
(2) Put 1 tsp. white sugar into the cup and stir, then sprinkle 2 tsp. yeast over the water.
(3) Place the measuring cup in a warm place for about 10min. Do not stir the water.
(4) The froth should be up to 1 cup. Otherwise the yeast is dead or inactive.
Salt
Salt is necessary to improve bread flavor and crust color. But salt can also restrain yeast from
rising. Never use too much salt in a recipe. But bread would be larger if without salt.
Egg
Eggs can improve bread texture, make the bread more nourish and large in size, the egg
should be stirred evenly.
Grease, butter and vegetable oil
Grease can make bread soften and delay storage life. Butter should be melted or chopped to
small particles before using.
Water and other liquid
Water is essential ingredient for making bread. Generally speaking, water temperature
between 20C and 25C is the best. The water may be replaced with fresh milk or water
mixed with 2% milk powder, which may enhance bread flavor and improve crust color.
Some recipes may call for juice for the purpose of enhancing bread flavor, e.g. apple juice,
orange juice, lemon juice and so on.
8 Environment
Do not throw away the appliance with normal household waste at the end of its life, but
hand it in at an official collection point for recycling. By doing this, you can help to preserve
the environment.
9 Guarantee and service
If you need service or information, or if you have a problem, visit the Philips website at
www.philips.com or contact the Philips Customer Care Center in your country. You can find
its phone number in the worldwide guarantee leaflet. If there is no Customer Care Center in
your country, go to your local Philips dealer.
Русский
1 Важная информация
Перед эксплуатацией прибора внимательно ознакомьтесь с настоящим руководством и
сохраните его для дальнейшего использования в качестве справочного материала.
Опасно!
•
Запрещается погружать корпус хлебопечи в воду или другие жидкости, а также
промывать его под струей воды.
•
Не закрывайте отверстия выхода пара и вентиляционные отверстия во время
работы хлебопечи.
Внимание!
• Данным прибором могут пользоваться
дети старше 8 лет и лица с ограниченными
возможностями сенсорной системы,
интеллектуальными или физическими
возможностями, а также лица с недостаточным
опытом и знаниями под присмотром других
лиц или после инструктирования о безопасном
использовании прибора и потенциальных
опасностях.
• Не позволяйте детям играть с прибором. Дети
могут осуществлять очистку и уход за прибором,
только если они старше 8 лет и только под
присмотром взрослых.
• Храните прибор и шнур в месте, недоступном
для детей младше 8 лет. Не допускайте свисания
шнура с края стола или места установки прибора.
• В случае повреждения сетевого шнура его
необходимо заменить. Чтобы обеспечить
безопасную эксплуатацию прибора, заменяйте
шнур только в авторизованном сервисном
центре Philips или в сервисном центре с
персоналом высокой квалификации.
• Данное устройство нельзя подключать
к внешнему таймеру или системам
дистанционного управления.
• Во время использования устройства некоторые
поверхности могут нагреваться.
• Добавляйте не более 560 г муки и 9 г, 12 г,
14 г дрожжей при использовании программ
приготовления обычного хлеба, экспресс-
выпечки и куличей соответственно.
•
Перед подключением прибора убедитесь, что указанное на нем номинальное
напряжение соответствует напряжению местной электросети.
•
Подключайте прибор только к заземленной розетке. Убедитесь, что сетевая
вилка правильно вставлена в розетку электросети.
•
Не пользуйтесь прибором, если поврежден сетевой шнур, штепсельная вилка,
корпус прибора или форма для выпечки.
•
Перед тем как вставить вилку в розетку электросети, убедитесь, что
нагревательный элемент, вращающийся вал формы для выпечки и внешняя
поверхность формы для выпечки являются чистыми и сухими.
•
Не используйте прибор для целей, отличных от описанных в данном руководстве.
•
Запрещается включать устройство в сеть или пользоваться панелью управления с
мокрыми руками.
•
Во время работы прибора соблюдайте достаточное расстояние от отверстий
выхода пара и вентиляционных отверстий, чтобы не обжечь лицо и руки.
•
Не открывайте крышку в процессе выпекания, т.к. тесто может осесть.
•
В процессе выпекания прибор и крышка являются очень горячими. Соблюдайте
осторожность, чтобы не обжечься.
•
Не извлекайте форму для выпечки во время использования.
•
В процессе выпекания не перемешивайте ингредиенты в форме для выпечки
кухонными принадлежностями.
•
Кладите ингредиенты только в форму для выпечки. Не кладите ингредиенты
и/или добавки непосредственно в прибор, чтобы не повредить нагревательный
элемент.Чтобы переложить варенье из формы для выпечки, наденьте кухонные
рукавицы, двумя руками поднимите форму для выпечки и слейте горячее варенье.
•
Чтобы удалить повидло из формы для выпечки, наденьте кухонные рукавицы,
двумя руками поднимите форму для выпечки и слейте горячее повидло.
www.manualslib.com
PHILIPS HD9015 USER MANUAL Pdf Download.
Register your product and get support at
www.philips.com/welcome
HD9015
HD9016
EN User manual
UK Посібник користувача
RU Руководство пользователя
KK Қолданушының нұсқасы
Specifications are subject to change without notice
© 2014 Koninklijke Philips N.V.
All rights reserved.
HD9015/HD9016_UM_V2.0
3140 035 31732
English
1 Important
Read this user manual carefully before you use
the appliance, and save the user manual for future
reference.
Danger
Never immerse the body of the breadmaker in
•
water or any other liquid, nor rinse it under the tap.
Do not cover the steam and air vents while the
•
breadmaker is operating.
Warning
• This appliance can be used by children aged from 8
years and above and persons with reduced physical,
sensory or metal capabilities or lack of experience
and knowledge if they have been given supervision
or instruction concerning use of the appliance in a
safe way and understand the hazards involved.
• Children shall not play with the appliance. Cleaning
and user maintenance shall not be made by children
unless they are older than 8 and supervised.
• Keep the appliance and its cord out of reach of
children less than 8 years. Do not let the mains cord
hang over the edge of the table or worktop on
which the appliance stands.
• If the mains cord is damaged, you must have it
replaced by Philips, a service centre authorised by
Philips or similarly qualified persons in order to
avoid a hazard.
• The appliance is not intended to be operated by
means of an external timer or a separate remote
control system.
• The accessible surfaces may become hot during use.
• Do not put over 560 g flour, and 9 g, 12 g, 14 g
yeast for general bread, super rapid bread, and cake
programs respectively.
Check if the voltage indicated on the appliance
•
corresponds to the local mains voltage before you
connect the appliance.
Only connect the appliance to an earthed wall
•
socket. Always make sure that the plug is inserted
firmly into the wall socket.
Do not use the appliance if the plug, the mains
•
cord, the body of the appliance or the bread pan is
damaged.
Make sure that the heating element, the rotating
•
shaft of the bread pan and the outside of the bread
pan are clean and dry before you put the plug in the
wall socket.
Do not use the appliance for any other purpose
•
than described in this manual.
Do not plug in the appliance or operate the control
•
panel with wet hands.
1/2
a
b
c
d
Do not come near the steam and air vents with
•
your face or hands when the appliance is operating.
Do not open the lid during the baking process, as
•
this may cause the dough or bread to collapse.
During the baking process, the appliance itself and
•
the lid become extremely hot. Be careful not to
burn yourself.
Do not remove the bread pan from the appliance
•
during use.
Never use any utensils to mix the ingredients in the
•
bread pan during a baking program.
Only put ingredients in the bread pan. Do not put
•
or spill any ingredients and/or additives in the inside
of the appliance to avoid damage to the heating
element.
When you remove jam from the bread pan, lift the
•
bread pan with both hands in oven mitts to pour
out the hot jam.
Caution
• This appliance is intended for household use only. If
the appliance is used improperly or for professional
or semi-professional purposes or if it is not used
according to the instructions in the user manual, the
guarantee becomes invalid and Philips refuses any
liability for damage caused.
Never use any accessories or parts from other
•
manufacturers or that Philips does not specifically
recommend. If you use such accessories or parts,
your guarantee becomes invalid.
Do not touch the bread pan with sharp utensils to
•
avoid damage.
Do not expose the appliance to high temperatures,
•
nor place it on a working or still hot stove or
cooker.
Always place the appliance on a stable, level and
•
horizontal surface.
Always put the bread pan in the appliance before
•
you put the plug in the wall socket and switch on
the appliance.
Always unplug the appliance after use.
•
Always let the appliance cool down before you
•
clean or move it.
Do not place the bread pan in a conventional oven
•
to bake bread.
The accessible surfaces may become hot when the
•
appliance is operating. Always use oven mitts when
you lift the bread pan by its handle or when you
handle the hot bread pan, the kneading blade or the
hot bread.
Beware of the hot steam that comes out of the steam
•
vents during baking or out of the breadmaker when
you open the lid during or after the baking process.
Do not lift and move the appliance while it is
•
operating.
Do not touch moving parts.
•
Do not expose the appliance to direct sunlight.
•
HD9015/HD9016
e
f
g
1
HD9015
HD9016
1 1
HD9016 only
BEEP
(HD9016 only)
Do not insert metallic objects or alien substances
•
into the steam vents.
Do not use the bread pan if it is damaged.
•
Always clean the appliance after use.
•
Do not clean the appliance in the dishwasher.
•
Do not use the appliance outdoors.
•
Leave a free space of at least 10cm above, behind
•
and on both sides of the appliance to prevent
damage due to radiated heat.
To avoid damage to the appliance, do not place
•
the bread pan or any other object on top of the
appliance.
Recycling
Your product is designed and manufactured with high quality materials and components,
which can be recycled and reused.
When you see the crossed-out wheel bin symbol attached to a product, it means the
product is covered by the European Directive 2002/96/EC:
Never dispose of your product with other household waste. Please inform yourself
about the local rules on the separate collection of electrical and electronic products.
The correct disposal of your old product helps prevent potentially negative
consequences on the environment and human health.
Electromagnetic fields (EMF)
This Philips appliance complies with all standards regarding electromagnetic fields (EMF). If
handled properly and according to the instructions in this user manual, the appliance is safe
to use based on scientific evidence available today.
Power failure backup
This appliance has a backup function that remembers the status before a power failure,
provided the power supply resumes within 10 minutes. If the power failure occurs during
a cooking process, the countdown of the cooking time continues where it left off when
the power supply resumes. If the power failure lasts longer than 10 minutes and the failure
occurs during a cooking process, the breadmaker automatically resets to the preset setting
when the power supply resumes. Open the breadmaker, remove its contents and start all
over again. If you have set the timer and the preset cooking process has not yet started when
a power failure occurs, the breadmaker automatically resets to the preset setting when the
power supply resumes. Open the breadmaker, remove its contents and start all over again.
2 Introduction
Congratulations on your purchase and welcome to Philips! To fully benefit from the support
that Philips offers, register your product at www.philips.com/welcome.
3 Your breadmaker
Main unit
Viewing window
Control panel
Cover lid
Mains plug
Control panel
Timer increase
Loaf weight
Timer decrease
Program menu
Crust color
Start/stop/cancel button
LCD status display
Accessories
Kneading blade
Measuring spoon
Bread pan
Measuring cup
Hook
Yoghourt
4 Use your breadmaker
Before the first use
1
Remove all packaging material from the appliance. Be careful not to throw away the
kneading blade.
6
9
1 0
2
Remove any labels from the body of the appliance.
3
To remove any dust that may have accumulated on the appliance, wipe the outside of
the appliance, the bread pan and the kneading blade with a damp cloth.
Note
• Never use scouring pads, abrasive cleaning agents or aggressive liquids such as petrol or
acetone to clean the appliance.
4
Dry all parts thoroughly before you start to use the appliance.
Prepare your breadmaker and ingredients
1
Put your breadmaker on a stable, horizontal and level surface.
2
Turn the bread pan anticlockwise and lift it out.
3
Push the kneading blade firmly onto the shaft.
4
Measure the ingredients for the recipe you want to prepare (see section ‘bread recipes’
below).
•
Always measure ingredients accurately.
•
All ingredients should be at room temperature unless recipe suggests otherwise.
5
Put ingredients in the bread pan in the order they are listed in the recipe.
Note
• Do not add more quantities than mentioned in the recipe as it may damage the breadmaker.
•
The yeast should be dry and separate from other ingredients when it is added to
the bread pan.
•
Butter and other fats should be cut into small pieces before putting in the bread
pan to aid the mixing.
•
If necessary, use a spatula to scrape down the sides of the bread pan to get the
mixture sticking to the wall back to the mix.
•
During the mixing stage, there will be beep sounds to alert you to add additional
ingredients such as nuts if you wish.
6
Put the bread pan in the appliance. Turn the bread pan clockwise until it locks into
position.
Note
• If the bread pan is not assembled properly, the kneading blade does not turn.
7
Put down the handle of the bread pan and close the lid of the appliance.
8
Put the mains plug in the wall socket.
» The appliance beeps and ‘1’ and ‘3:55’ appear on the display, which refers to the
‘White’ program.
Set your breadmaker
1
Press
(menu button) repeatedly to select the program.
•
The select program number and processing time are displayed.
•
For detailed program description, see section ‘Bread recipe’ below.
2
Press
(crust color button) repeatedly to select the crust color.
•
The selected crust color can be changed from light to dark.
3
Press
(loaf weight button) repeatedly to select the loaf weight.
•
Make sure the selected weight is appropriate for the amount of ingredients of the
selected recipe. See section ‘Bread recipe’ below.
4
Press
(Start/stop button) to start bread making process.
Caution
• During the baking process, the breadmaker itself and the lid become extremely hot. Be careful
not to burn yourself.
» The display counts down the processing time until the bread is ready.
» When the baking process is finished, the breadmaker beeps and goes to the keep-
warm mode (for 60 minutes).
Preset time for delayed baking
You can use the timer if you want the bread to be ready at a later time. The maximum delay
time that can be set is 13 hours.
Note
• Do not use the timer function with recipes that require fresh ingredients that may go bad, for
instance eggs, fresh milk, sour cream or cheese.
1
Put all ingredients in the bread pan.
2
Select the appropriate program, loaf size and crust color for your recipe.
» The total processing time is shown on the display.
3
Press
(timer increase and timer decrease) to choose the desired preset time.
» The breadmaker enters preset mode.
•
For example, if the current time is 19:00 and you want your bread ready at 7:00
next morning (12 hours later), you can set the preset time to 12:00.
•
If you keep the button pressed, the time increases more quickly.
•
If the time on the display reaches 13 hours and you still keep the timer button
pressed, the display goes back to the baking time of the set program.
4
Press
(start/stop/cancel button).
» The timer counts down the set time in minutes.
» The bread is ready when the timer has counted down to 0:00 and the
breadmaker beeps.
Finish the baking process
Caution
• The inside of the breadmaker, the bread pan, the kneading blade and the bread are very hot.
• Always use oven mitts when you remove the bread pan at the end of the baking cycle or at
any time during the keep-warm mode.
1
To power off the breadmaker, remove the mains plug from the wall socket.
2
Using pot holders or oven mitts, open the lid and turn the bread pan anticlockwise.
3
Grab the bread pan by its handle and lift it out.
4
Turn the pan upside down, hold the handle and shake the bread out.
Note
• Do not use metal utensils to remove the bread, as these may damage the non-stick coating of
the bread pan.
• Be careful, the bread pan and the bread are hot.
5
Use the hook supplied to remove the kneading blade from the shaft/bread.
•
Always make sure that the kneading blade does not stay inside the bread,
otherwise you may damage the kneading blade when you slice the bread.
6
Let the breadmaker cool down before you clean it.
Making Yoghurt (HD9016 only)
Note
•
Ensure the yoghurt container is thoroughly washed with warm water and soap, and it is
dried before making yoghurt.
•
Full fat, skim, or 2% milk can be used
•
Make sure the yoghurt is fresh and thus the culture starter is active
1
The milk and yoghurt mixture proportion is 10:1 (For example: 400ml Milk with 40ml
yoghurt)
2
Pour milk into the yoghurt container
3
Add yoghurt into the yoghurt container, and mix well.
4
Close and tighten the lid
5
Start the yoghurt program, and yoghurt will be ready in 8 hours
5 Cleaning and Maintenance
Note
• Uplug the breadmaker before starting to clean it.
• Wait until the breadmaker has cooled down sufficiently before cleaning it.
• Never immerse the appliance in water or any other liquid, nor rinse it under the tap.
• Never use scouring pads, abrasive cleaning agents or aggressive liquids such as petrol or
acetone to clean the appliance.
• For maximum safety, keep the appliance clean and free of grease and food residues.
Interior
Inside of the cover and the main body:
•
Wipe with wrung out and damp cloth.
•
Make sure to remove all the food residues stuck to the breadmaker.
Heating element:
•
Wipe with wrung out and damp cloth.
•
Remove sfood residues with wrung out and damp cloth or toothpicks.
Exterior
Surface of the cover lid and outside of the main body:
•
Wipe with a cloth damped with soap water.
•
ONLY use soft and dry cloth to wipe the control panel.
•
Make sure to remove all the food residues around the control buttons.
Accessories
Bread pan:
•
Clean the bread pan with a soft cloth moistened with hot water or washing-up liquid.
•
Do not immerse the bread pan in water and do not clean it in the dishwasher.
Kneading blade, measuring spoon and cup, and hook:
•
Soak in hot water and clean with sponge.
Tip
• After baking, immediately remove the kneading blade from the bread pan to prevent it from
getting stuck.
6 Storage
Store your breadmaker in a safe and dry place.
Русский
1 Важная информация
Перед эксплуатацией прибора внимательно
ознакомьтесь с настоящим руководством и
сохраните его для дальнейшего использования в
качестве справочного материала.
Опасно!
Запрещается погружать корпус хлебопечи в воду
•
или другие жидкости, а также промывать его
под струей воды.
Не закрывайте отверстия выхода пара и
•
вентиляционные отверстия во время работы
хлебопечи.
Внимание!
• Данным прибором могут пользоваться дети старше
8 лет и лица с ограниченными возможностями
сенсорной системы, интеллектуальными
или физическими возможностями, а также
лица с недостаточным опытом и знаниями
под присмотром других лиц или после
инструктирования о безопасном использовании
прибора и потенциальных опасностях.
• Не позволяйте детям играть с прибором. Дети
могут осуществлять очистку и уход за прибором,
только если они старше 8 лет и только под
присмотром взрослых.
• Храните прибор и шнур в месте, недоступном
для детей младше 8 лет. Не допускайте свисания
шнура с края стола или места установки прибора.
• В случае повреждения сетевого шнура его
необходимо заменить. Чтобы обеспечить
безопасную эксплуатацию прибора, заменяйте
шнур только в авторизованном сервисном
центре Philips или в сервисном центре с
персоналом высокой квалификации.
• Данное устройство нельзя подключать
к внешнему таймеру или системам
дистанционного управления.
• Во время использования устройства некоторые
поверхности могут нагреваться.
• Добавляйте не более 560 г муки и 9 г, 12 г,
14 г дрожжей при использовании программ
приготовления обычного хлеба, экспресс-
выпечки и куличей соответственно.
Перед подключением прибора убедитесь, что
•
указанное на нем номинальное напряжение
соответствует напряжению местной электросети.
Подключайте прибор только к заземленной
•
розетке. Убедитесь, что сетевая вилка правильно
вставлена в розетку электросети.
Не пользуйтесь прибором, если поврежден
•
сетевой шнур, штепсельная вилка, корпус
прибора или форма для выпечки.
Перед тем как вставить вилку в розетку
•
электросети, убедитесь, что нагревательный
элемент, вращающийся вал формы для выпечки
и внешняя поверхность формы для выпечки
являются чистыми и сухими.
Не используйте прибор для целей, отличных от
•
описанных в данном руководстве.
www.manualslib.com
Philips Daily Collection HD9015 инструкция
Полная инструкция обслуживания устройства Philips Daily Collection HD9015, как должна выглядеть?
Инструкция обслуживания, определяемая также как пособие пользователя, или просто «руководство» — это технический документ, цель которого заключается в использовании Philips Daily Collection HD9015 пользователями. Инструкции пишет, как правило технический писатель, языком, доступным для всех пользователей Philips Daily Collection HD9015.
Полная инструкция обслуживания Philips, должна заключать несколько основных элементов. Часть из них менее важная, как например: обложка / титульный лист или авторские страницы. Однако остальная часть, должна дать нам важную с точки зрения пользователя информацию.
1. Вступление и рекомендации, как пользоваться инструкцией Philips Daily Collection HD9015 — В начале каждой инструкции, необходимо найти указания, как пользоваться данным пособием. Здесь должна находится информация, касающаяся местонахождения содержания Philips Daily Collection HD9015, FAQ и самых распространенных проблем — то есть мест, которые чаще всего ищут пользователи в каждой инструкции обслуживания
2. Содержание — индекс всех советов, касающихся Philips Daily Collection HD9015, которое найдем в данном документе
3. Советы по использованию основных функций устройства Philips Daily Collection HD9015 — которые должны облегчить нам первые шаги во время использования Philips Daily Collection HD9015
4. Troubleshooting — систематизированный ряд действия, который поможет нам диагностировать а в дальнейшем очередность решения важнейших проблем Philips Daily Collection HD9015
5. FAQ — чаще всего задаваемые вопросы
6. Контактные данные Информация о том, где искать контактные данные производителя / сервисного центра Philips Daily Collection HD9015 в данной стране, если самостоятельно не получится решить проблему.
www.usermanuals.org